Duplicate File Finder User Manual
Previous: Installation Contents Next: Progress WindowPart 3:
The Main Window

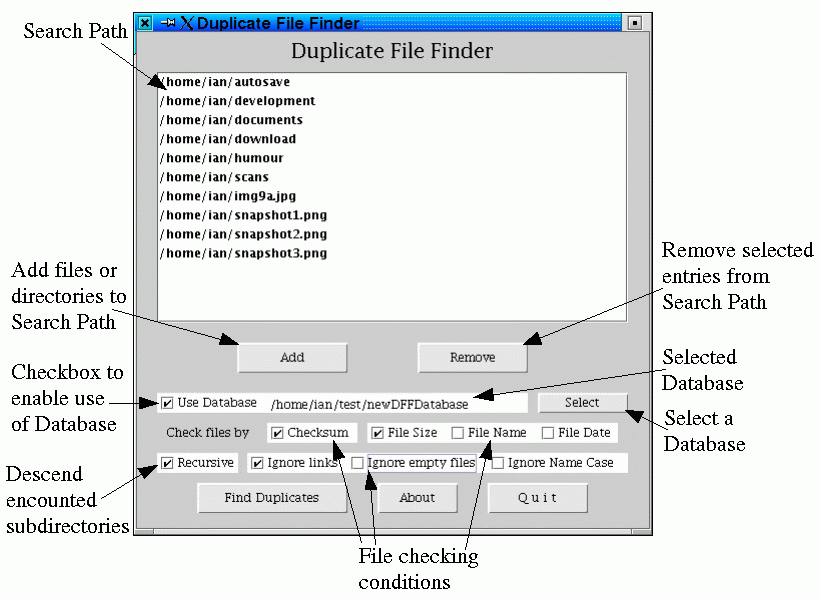
Figure 1: The Duplicate File Finder Main Window
Search Path List
The Search Path List shows what files and directories you have selected for searching through for duplicated files. During the search, this order will be followed in recursively examaning files and directories.
To add elements to the Search Path List, click the "Add" button.
Add Button
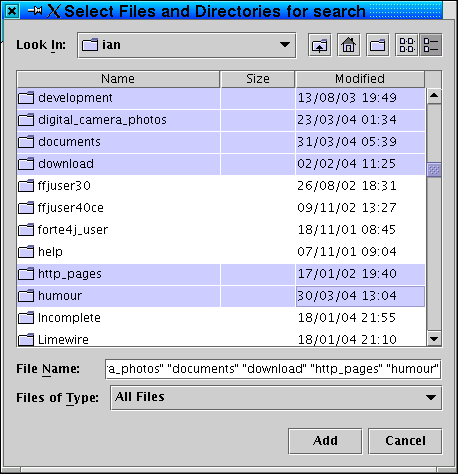
The "Add" button is used to add additional files and directories to the search path. Click on it and you will be presented with the standard Java file chooser.

Figure 2: The File Chooser
-
Double clicking on a directory name will enter and display
that directory. Double clicking on a file will add that file to
the search path and close the file chooser.
Multiple files and directories can be selected from the currently displayed directory. To select multiple individual files, hold down the control key and select the files and directories you want to examine. To select a number of directories and/or files consecutively, select the entry you want to start with, hold down the shift key and click the last entry you want. After you have selected the files and directories you want to examine from this directory, click the add button. Your selections will be added to the Search Path List. If you are making multiple selections, do not be concerned by there being only one entry in the "File name:" field, all your selections will be added.
To select additional files, repeat the process until you have all files and directories you want to examine.
Remember, when you add a directory to your search path list, all files and sub directories inside will be automatically examined.
Remove Button
If you find you have one or more entries in your Search Path List that you don't want, select them and click the Remove button. Your selections will be immediately removed from the search path.
Note there is no undo for this operation, if you incorrectly remove an entry, you must add it again.
Use Database Checkbox, the Selected Database field, and the Select Button
The database is currently stores file names, checksums and sizes, and using the database makes reference to that information if the same database file is used at a later point in time. Note that at the moment the database isn't really a database as such, it is only a file that stores information. This concept will be more appropriately developed in a future version. Checking this box enables the database functionality. This then allows you to either create a new database, or select an existing one to compare files in the search path against.
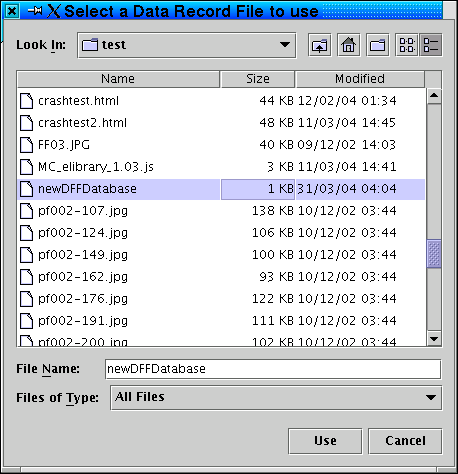
To select a database name, you must click the Select button. This will present you with a file chooser similar to that which is shown for selecting files into the search path, however the "Add" button is replaces by a "Use" button.

Figure 3: Database Selection
Double clicking on a directory name will enter and display that directory, as in the process of adding files and directories to the search path. Double clicking on a file will select that file as the chosen database.
If you wish to create a new database, navigate to your desired location to store the new database, enter its name in the "File name:" field, and click the Use button.
In both cases, once your selection is made the chooser window will close and your selected or entered name will be shown in the Selected Database field in the main window.
If you have chosen a new database, you will be prompted if you really want to create the new database. Clicking "Yes" will create the database, clicking "No" will not and you will need to make a new selection if you still want to use the database for this search.
If you decide you don't want to use the database for this particular search, uncheck the "Use Database" checkbox. The "Select" button will be disabled and the Selected Database field will be cleared. Your selected database name will be stored, so if you later check the "Use Database" checkbox again, your most recent database selection will be redisplayed and used in the Selected Database field.
The "Check Files By" Options
The check files by options allow you to choose what criteria should be used in determining which files should be listed as being duplicates. It is possible to choose more than one criteria to use in determining if two or more files might be the same. All chosen criteria are used in determining if some files might be the same. For example, if you check by the default method of checksum and file size, then for two files to generate a match, both checksums must be identical and both file sizes must be identical.
Additionally, you can choose if links, both symbolic and hard, and empty files should be ignored during the search.
Checksum
In simple terms, making a checksum of a file is similar to taking its fingerprint. It provides a highly accurate way of identifying a file without needing to examine the entire file every time you want to compare another file to it.
As a checksum is a reliable method of determining if two files match, it is set by default.
File Size
If checking by File Size is selected, file sizes will be included in the criteria for determining if files are identical. In this case, the files being examined must have the same file size, in addition to any other criteria, for the files to be listed as identical.
File Size is set by default in addition to the Checksum because these two criteria together provide a highly reliable method of determining if files are identical to each other.
File Name
If checking by name is selected, file names will be included in the criteria for determining if files are identical. In this case, the files being examined must have the same name, in addition to any other selected criteria, for the files to be listed as identical.
File Date
This options sets if the modification date of files being examined should be considered. If it is set, files examined will have to have the same date and time of modification in order to generate a match.
Recursive
The
Recursive check box sets if subdirectories encountered during the
search should also be descended into and the files and directories
inside searched too. If checked, Duplicate File Finder will
descend into all directories it finds and examine the files and
directories contained within.
If this checkbox is not checked,
Duplicate File Finder will not descend into the directories it
encounters. Note that if you specifically select a directory in
the Search Path and the Recursive option is turned off, the files
inside that directory will be examined, but any subsequently found
subdirectories in those directories will be ignored.
Ignore Links
The Ignore Links option instructs Duplicate File Finder to not follow symbolic or hard links during the search.
This option is included so that, for example, if a link points to another file, examining the link actually results in the file that link points to being examined, and this would therefore produce a match causing Duplicate File Finder to list both the original file and the link as being duplicates.
Links also pose a problem if, for example, they point to another directory, especially a parent directory. Following these links may result in files and directories being examined that you don't want to examine. Worse still, if a link points to a parent directory, following that link would result in a never ending descent into the directory structure via that link.
Ignore Links is set by default to avoid problems that can arise by following links, and especially to avoid what could become a never ending search.
Ignore Empty Files
This option instructs Duplicate File Finder to not include 0 length files in its checking. As all 0 length files can be considered identical, including this option avoids having these empty files being listed as identical to each other. This option is more for convenience, there are no adverse side affects by not using it.
Ignore Name Case
This option is used when checking the names of files. If Ignore Name Case is enabled, capitals and lower case letters will be treated as the same and generate matches. If not enables, capitals and lower case letters will be treated as being different to each other and not generate a match.
The "Find Duplicates" Button
After you have set all of the options and selected the files and directories you want to check, you are ready to do the search. Clicking the Find Duplicates button starts the search. The main window will be disabled, and the Progress Window is opened to show which and how many files have been examined.
Upon completion of the search, the Progress Window is disabled, and if any duplicate files were found the Results Window opens. If no duplicate files are found, a message window opens to advise of this.
The "Quit" Button
As you might expect, clicking the Quit button exits Duplicate File Finder.
The "About" Button
Clicking the About button shows some information about Duplicate File Finder. It's not very exciting.
Previous: Installation Contents Next: Progress Window